The Digital I/O Handbook – Chapter 4
The Digital I/O Handbook
A Practical Guide to Industrial Input & Output Applications
Digital I/O Explained
Renowned technical author Jon Titus and the President and CEO of Sealevel Systems, Tom O’Hanlan, clearly explain real-world digital input/output implementation from both a hardware and software perspective. Whether you are a practicing engineer or a student, The Digital I/O Handbook will provide helpful insight you will use again and again.
- Covers a wide range of devices including optically isolated inputs, relays, and sensors
- Shows many helpful circuit diagrams and drawings
- Includes software code examples
- Presents common problems and solutions
- Detailed glossary of common industry terms
“What I like most is its mix of hardware and software. Most pages have a bit of code plus a schematic. All code snippets are in C. This is a great introduction to the tough subject of tying a computer to the real world. It’s the sort of quick-start of real value to people with no experience in the field.” – Jack Ganssle, The Embedded Muse, January, 2005.
You can purchase the Digital I/O Handbook for $19.95 by clicking here. The Digital I/O Handbook is FREE with any qualifying Sealevel Digital I/O product purchase.
Chapter 4 – Sensor Interfacing
In Chapter 3 you learned how to set up a computer to acquire data from electronic devices. In this chapter, you’ll learn more about connecting, or interfacing, several types of sensor outputs to a computer.
Topics Covered
- Example 1: Thermal switch
- Example 2: Level switch
- Example 3: Hall-effect proximity switch
- Example 4: Photoelectric sensor
- Example 5: Shaft encoder
- Example 6: Output more than 8 bits
Example 1. Thermal switch
A thermal switch such as a Klixon Series 6786 from Texas Instruments (www.ti.com) provides a snap-action metallic disk that responds to temperature changes. At a specified temperature, the disk either makes or breaks an electrical contact, depending on the model. Buyers can specify an operating temperature and whether the thermal switch provides a normally-open (NO) or normally-closed (NC) contact. When the switch reaches the specified temperature, an NC switch will open and an NO switch will close.
Assume you have a NO switch that operates at 40°C (104°F). When the contacts close, you want a computer to start a process, say, turn on a fan. Because the switch supplies uncommitted contacts — no connections to power or ground — you can connect the switch to a computer in several ways, as shown in Figure 4-1a-d. In this type of application, it’s unlikely the circuit needs to debounce the switch.
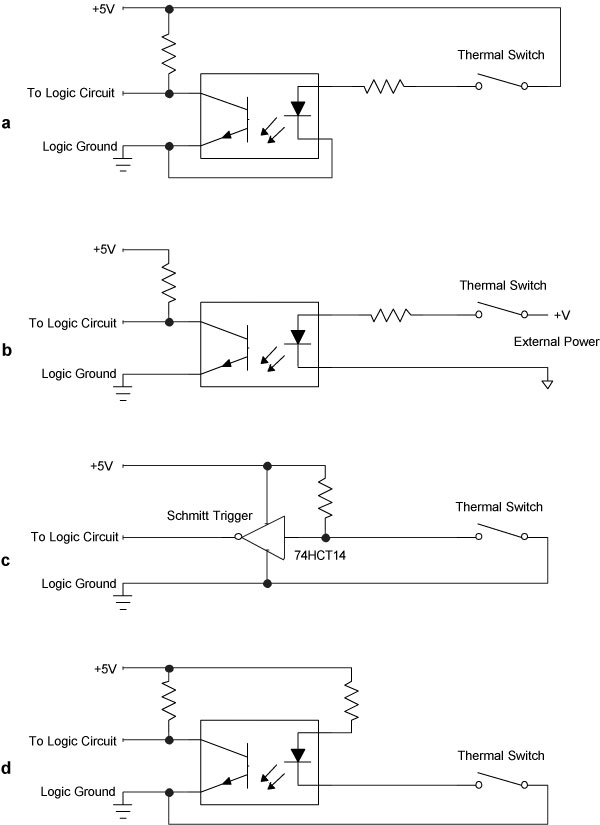
Figure 4-1
A simple on-off SPST switch can connect to a computer interface either directly or through an optical isolator. The direct connection should limit the distance from the switch and the interface to a few inches.
If the switch forms part of the computer’s circuitry, perhaps as part of a controller that keeps the computer cool, the circuit probably can use a power supply in common with the computer, as shown in Figures 4-1a, -1c and -1d. (Note the use of a Schmitt trigger in one circuit.) This device “cleans up” the edges of the logic transitions produced by the switch to provide a “clean” TTL-compatible signal. If the thermal switch exists at some distance from the computer, consider using an optical isolator, as shown in Figure 4-1b.
Switches with SPST contacts exist in many other devices, such as magnetic sensors, float switches, and air-flow sensors. The circuits developed in this example should work well with them all. Most temperature-sensitive switches exhibit an effect called hysteresis. In a typical switch, the contacts close at, say, 40°C (104°F), but they don’t reopen until the temperature decreases to 35°C (95°F), as shown in Figure 4-2. Thus, the thermal switch will not rapidly open or close as the temperature hovers around 40°C. The temperature must decrease to 35°C to reset the switch. This built-in effect keeps a computer from trying to regulate a temperature within a degree or two of its setpoint. Even home heating and cooling thermostats provide a few degrees of hysteresis. If they didn’t the heat and air conditioner would go on and off in short cycles.
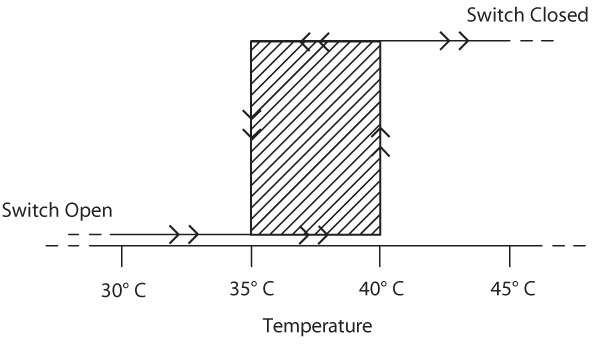
Figure 4-2
Many sensors exhibit some form of hysteresis. In this example, a thermal switch closes its contacts at 40°C. As the switch cools, the contacts open only when the switch reaches 35°C. Hysteresis may have a narrower range, depending on the sensor and its application.
Example 2. Level switch
A capacitive level detector provides a SPDT switch as its output indicator. The specification sheet provides information about how the
detector works and it shows the switch’s operation when the detector senses a change in capacitance near the probe. The detector operates an internal relay that provided a set of SPDT contacts, so you can treat the sensor’s outputs just as you would the thermal switch shown in Figure 4-1.
Because the switch offers SPDT contacts, you decide to add a cross-coupled NAND gate, as shown previously in Figure 3-4, to debounce the switch. In theory, that circuit will work, but the wires that connect the SPDT switch to the cross-coupled NAND gates may have to run for a considerable distance. Unfortunately, most TTL signals should not run more than about 10 inches from one device to another! So, we recommend you use one of the optically isolated circuits shown in Figure 4-1.
If you sense a level using a float switch, a capacitance switch, or similar sensor, remember that liquids can slosh around in containers and that pumping and draining may cause liquid levels to fluctuate. Without some built-in hysteresis, a level switch can turn on and off when it detects every slight disturbance in liquid level. Sensor specification sheets should specify the hysteresis range for an on-off sensor.
If a sensor does not include some form of hysteresis, software can often “even out” a switch signal to determine whether or not its contacts are closed. When the software detects a switch closure (or opening), instead of immediately taking action, the software can wait briefly and test the switch several more times with a short delay between tests. This type of software filtering or “debouncing” proves helpful when you can’t find a suitable sensor with hysteresis, or if you can’t easily debounce a switch with electronics.
The following program listing shows how software could test a switch several times in a subroutine. In this example, the software must detect a logic 0 from the switch (at bit D2), seven times in a row, with a 10-millisecond delay between tests. The logic-0 state indicates a switch-closed condition. A subroutine (not shown) provides a 10-millisecond delay between tests of the switch’s state.
Dim | max_count | As Byte |
Dim | switch_count | As Byte |
Dim | switch_mask | As Byte |
Dim | switch_port | As Integer |
max_count | = 7 | |
switch_mask | = &H02 | '00000010 |
switch_port | = 135 |
'Switch-debounce subroutine | |||
Sub Switch_check | |||
switch_count | = 0 | 'Initialize counter | |
For loop = 1 to max_count | |||
If (inportb(switch_port) AND switch_mask = 0) | |||
Then | |||
(switch_count = switch_count + 1) | |||
End If | |||
milli_sec_delay 10 | 'Millisecond-delay subroutine call | ||
Next | |||
If max_count = switch_count | |||
Then | 'Switch closed, so do this... | ||
End If | |||
End Sub | |||
Each time through the test loop, the software increments a switch_count variable if it detects a logic-0 from the switch. If at the end of seven tests, the switch_count equals the number of passes through the loop, max_count, the software assumes the switch really exists in its closed state.
As an alternate approach, the software could test for, say, five proper states out of seven tries in the loop. To do so, substitute the following four statements for the last four in the listing above:
If (max_count - 2) <= switch_count | 'OK if at least | ||
'5 of 7 tests | |||
Then 'Switch closed, so do this... | 'detect a switch | ||
'closure | |||
End If | |||
End Sub | |||
Before we leave this example, two notes about programming:
- Most switches will stop bouncing in under 10 milliseconds, so your application software may not need to go to the extremes shown above. We included the code as a teaching example. Some switches, though, can bounce for as long as 1/6th or 1/5th of a second! (Refs. 1 and 2.)
- If you need to debounce several switches in software, you can set up a subroutine for each one. Or, you can set up a general switch-test subroutine, procedure, or function that can accept arguments (values) transferred to it. These values include max_count, switch_mask, and switch_port for each switch you need to test. This approach makes it easy to change your parameters without having to rewrite the switch-test code for each switch.
Example 3. Hall-effect proximity switch
Semiconductor Hall-effect switches respond to changes in magnetic fields, so designers use them to detect the proximity of ferro-magnetic materials. These solid state switches act rapidly and can detect thousands of changes per second, so they find use in applications that count revolutions on a mechanical shaft, detect the presence of a magnet, and so on.
Several Hall-effect switches from Phoenix America (www.phoenixamerica.com) and Allegro Microsystems (www.allegromicro.com) provide “open collector” outputs. How can this output connect to an input port? This type of output comes from an NPN transistor that connects a circuit to ground, and it will readily provide a signal to an input port.
Many Hall-effect switches require an external power source. For these switches, you can choose to connect the ground from that power source to your computer system ground and directly connect the switch as shown in Figure 4-3a. That circuit will work when you can make a short-distance connection between your computer system and the switch. We recommend using the optically isolated circuit shown in Figure 4-3b because it keeps the Hall-effect switch’s power isolated from the computer. If you use an optical isolator in your interface circuit, the Hall-effect switch’s external power supply can provide current to drive the LED.
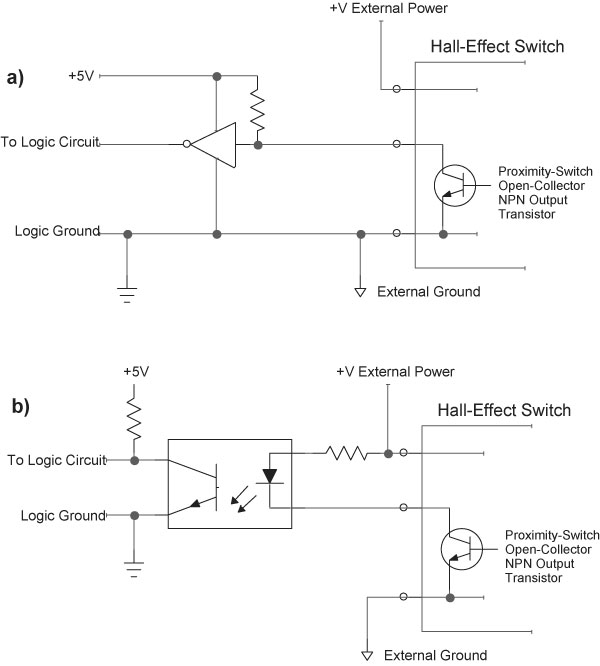
Figure 4-3
A Hall-effect switch with an NPN output transistor (open collector) sinks current to ground. The switch can use either a direct connection or an optically isolated connection to an input port.
Example 4. Photoelectric sensor
Commercial photoelectric sensor modules, such as those in the CX Series from Automation Direct (www.automationdirect.com), detect the presence or absence of an object in a light beam. Some detectors provide a built-in light source and rely on reflections from an object. Other sensors require a remote light source and detect objects that interrupt a light beam. The sensor manufacturer offers models with four output options: NPN NO, NPN NC, PNP NO, or PNP NC. How can you interface these sensors to a computer?
First, the NC and NO refer to the output as either normally closed or normally open, respectively. So, think in terms of a normally-open or normally-closed switch.
Second, the PNP and NPN refer to the type of transistor on the output. An NPN transistor sinks current to ground while a PNP transistor sources current from a higher potential. Treat these outputs as you would any other NPN or PNP output. The CX Series photoelectric sensors provide a power source, so use an optical isolator to separate the sensor circuits from the computer circuits as shown in Figure 4-4.
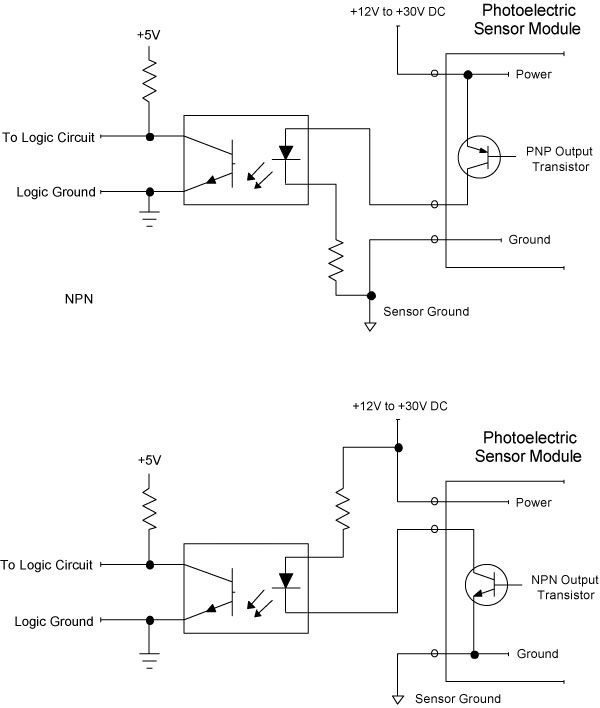
Figure 4-4
Some photoelectric sensors offer a choice of PNP or NPN outputs. This schematic diagram shows how to connect either output type to an input port through an optical isolator.
Example 5: Shaft encoder
Incremental shaft encoders produce a fixed number of pulses or “counts” per revolution of a central shaft. Manufacturers offer a range of encoder types that offer various counts/revolution (CPR)—from 35 CPR to several thousand CPR. The phase of the output pulses establishes the direction of the shaft’s rotation and its relative position. A 1000 CPR encoder that produces a series of 212 pulses lets you determine the shaft has moved 360° * 212/1000, or 76° from its previous position.
This type of incremental encoder does not provide an absolute position of, say, 95°. It only provides an indication of the distance moved from the previous position. (By measuring the rate at which pulses occur, you can determine the rotational speed of the shaft.)
An incremental encoder produces two square-wave outputs that an external counter can accumulate to determine the relative change in a shaft’s position. The lead-lag phase relationship between the two square waves indicates whether a shaft rotates clockwise or counterclockwise, as shown in Figure 4-5. A D-type flip-flop can use the out-of-phase signals to produce a “rotation” signal. The circuit shown includes two 74HCT4538 monostable circuits that combine to produce a short pulse for each transition on the A or B square wave.
Additional circuitry, perhaps a 10- or 12-bit up-down counter (not shown), can use these pulses and the flip-flop’s direction signal to keep track of the shaft’s position. Microcontrollers that can connect directly to an incremental encoder can handle the counting through software.
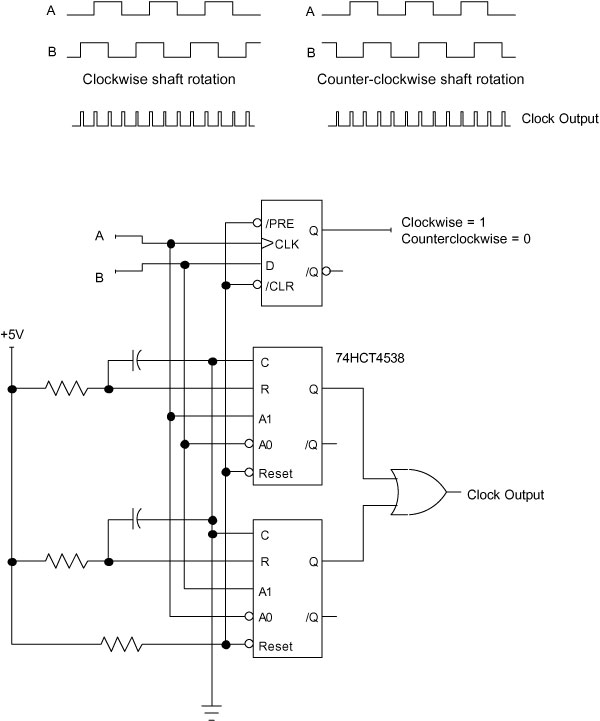
Figure 4-5
The phase relationship between square waves produced by a shaft encoder lets a flip-flop IC determine rotation direction. A pair of monostable ICs produces a pulse for each transition on the A or B output from the encoder.
Some incremental encoders include an optional index output that produces a single short pulse at one point in a complete rotation. Circuitry can use this pulse to reset a count or increment a separate “turns” counter. US Digital (Vancouver, WA; www.usdigital.com) provides a variety of encoders and interface ICs that can simplify the design of interface circuits. We won’t go into more detail on how rotary encoders operate.
Assume for the moment you have purchased or designed an external counter circuit for an incremental encoder with 1024 counts/revolution. That means each complete rotation of the encoder’s shaft will produce a 10-bit binary count: 210 = 1024. So far, input ports have acquired data in 8-bit bytes, so how can a computer input 10 bits from a counter? You can split the 10 bits into an 8-bit byte at one input port, and route the remaining two bits to another input port, as shown in Figure 4-6. (We have shown the unused bits at input port 202 connecter to logic 1; +5V through a pull-up resistor.)
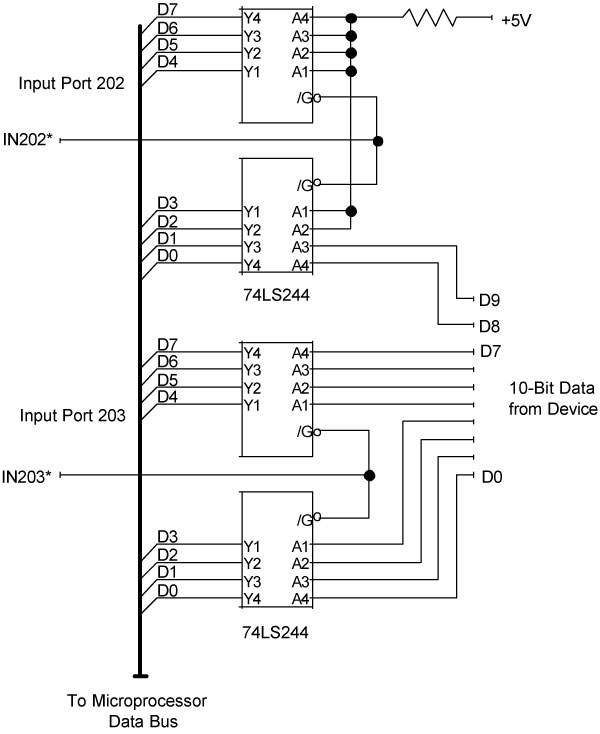
Figure 4-6
Two input ports let software gather data from a device that puts out more than eight bits. If the data can change rapidly, this arrangement can lead to errors.
This arrangement may run into problems because it requires two input operations, separated by a finite time. To illustrate the potential problem, assume a split of a 10-bit value 00111101012 (245) into 00, the two most-significant bits, and 111101012, the eight least-significant bits. Several counts, each incremented by 1 appear as:
00 | 11110101 | (245) |
00 | 11110110 | (246) |
00 | 11110111 | (247) |
00 | 11111000 | (248) |
00 | 11111001 | (249) |
and so on... | ||
Assume the software first acquires the least-significant eight bits, D7—D0 at input-port 203 and then acquires the two most-significant bits, D9—D8 at input-port 202.
Given a count of 00 111101012 at the encoder’s circuit, you would expect to find those bits in the computer after the two input-port commands execute. As long as the data remain constant between the two input commands, you’ll see the expected result.
But suppose a mechanism moves the shaft between the time the software acquires bits D7—D0 and when it acquires bits D9—D8. The movement adds 20 pulses to the count, which goes from 00 111101012 (245) to 01 000010012 (265). That change represents a rotation of only about 7°. The steps below show what happens in this case:
- The computer acquires the eight LSBs: 00 111101012
- A mechanism rotates the shaft and the counter increments its count by 20 to produce a new count of: 01 000010012
- The computer now acquires the two MSBs: 01 000010012
Now, when the computer combines the binary values, it turns into:
01 111101012, which is WRONG!
The motion of the shaft between the two input operations caused the problem. Granted, this condition won’t occur frequently, but without some way to prevent it, you will never know when it has occurred!
Any circuit that must transfer more than eight bits at a time, from a single source such as a counter, must first latch the entire n-bit value into a set of latches or D flip- flops as shown in Figure 4-7. The 74LS374 inputs provide D flip-flops that latch the data (controlled by the CLK inputs). The 74LS374 ICs also provide three-state outputs (controlled by the /OC inputs). So the same ICs provide the latch and three-state logic functions. Some devices, such as digital meters, may provide latched outputs, but they may lack three-state outputs.

Figure 4-7
The 74LS374 ICs in this circuit first latch all 10 bits and then transfer a byte at a time to a computer. Latching the bits provides stable data for the software to acquire.
To start an acquisition, the computer first latches the entire 10-bit value from the counter by strobing both 74LS374 ICs with the OUT231 pulse. In this case, the output-port instruction such as outportb(231, n) simply generates the latch-control pulse. Although the 8-bit value for n goes out on the data bus, no device actually uses it. So it doesn’t matter what value you use for n. Software often uses output-port commands to create a pulse for use in an interface circuit.
After latching the entire 10-bit value simultaneously, the computer can gather the bits from input ports 202 and 203 and reassemble them with software. Any changes of the counter’s outputs will not affect the data saved in the latch. After acquiring the two bytes from input ports 202 and 203, how does the software recombine them into a value an application program can use?
The software below shows the needed operations. The software needs two bytes to save input-port data and an integer value (16 bits) to save the final 10-bit count:
Dim | counter_value | As Integer |
Dim | MS_bits | As Byte |
Dim | LS_bits | As Byte |
outportb(231, 0) | 'Latch all bits | |
MS_bits = inportb(202) | 'Get bits D9-D8 | |
LS_bits = inportb(203) | 'Get bits D7-D0 | |
MS_bits = MS_bits AND &H03 | ||
counter_value = LS_bits + (256 * MS_bits) | ||
The last statement multiplies the decimal value of bits D9 and D8 by 256 to compute the value they represent at the counter. Then the statement adds them to the decimal value of bits D7—D0. The result, counter_value, will have a value of 0 to 1023. Remember, the computer “sees” bits D9 and D8 at positions D1 and D0 at input port 202. The
input port and the computer have no knowledge of the “weights” of these bits as they come from the 10-bit counter circuit. You must track their value and reconstruct it using software.
But why does the sequence of commands include a bit-wise AND with a mask of 000000112? That bit-wise AND operation ensures bits D7—D2 in the MS_bits byte get set to zero so they will not get used in calculation of the 10-bit count value. The circuit in Figure 4-7 forced the unused bits at input port 202 to logic 1, so the bit-wise AND clears them to logic 0. Couldn’t the circuit have simply forced the bits to logic 0 (ground) to save the trouble of using a bit-wise AND? Of course. But we would have included the logic operation in any case. Never assume you know the state of unused bits. Always play it safe and mask off any unused or unneeded bits.
At some point, an engineer might decide to use some of the “unused” bits at port 202 to detect flags or input switch data. Masking out those bits while writing the software ensures you won’t have difficulties later due to later unplanned changes in circuits.
Example 6: Output more than 8 bits
Simultaneously transferring more than eight bits to an external device may cause timing problems much like those
experienced in the incremental-encoder example. Although two output ports handle 16 bits, software can update only one port at a time. So, if an output device requires that an interface circuit apply more than eight bits simultaneously, first set up an n-bit latch that acquires all n bits at one time. Then use as many output ports as necessary to “feed” data to that latch, one byte at a time.
Figure 4-8 shows a circuit set up as an interface for a 12-bit device. The circuit uses a 74LS374 D-flip-flop IC for output port 003 and another 74LS374 IC as output port 004. The pair of 74LS374 ICs on the right side of the circuit forms an intermediate 16-bit latch that will simultaneously transfer all data from the output ports to the 12-bit device. (The circuit does not use four of the output bits. Never tie unused ports to +5V or ground!)
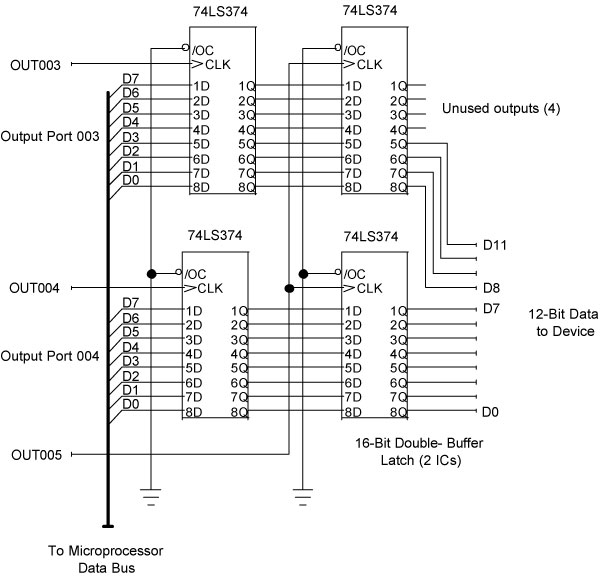
Figure 4-8
A double-buffered interface circuit lets two 8-bit output ports produce data for simultaneous transfer to a 12-bit device. Many output devices come with built-in double buffers.
To perform a transfer, software first sends individual bytes to ports 003 and 004 and then simultaneously transfers all the data to the 12-bit device by using an outportb command for port 005. Keep in mind the needed outportb(005, n) command serves only to generate the OUT005 pulse. Although the command transfers byte n onto the computer’s data bus, no device uses it, so the value of n is immaterial.
This technique often goes by the name “double buffering,” and many manufacturers provide the necessary double-buffer circuits in their devices. The Analog Devices (Norwood, MA; www.analog.com) AD5341 12-bit digital-to-analog converter (ADC), for example, includes double buffering in the chip so 8-bit microprocessors and microcontrollers can use the IC without external circuitry.
Before software can send more than eight bits to an external device, it must “split” the data into the various 8-bit bytes, and math and bit-wise-logic operations help. (We’ll assume a 16-bit value, but the techniques apply to higher bit counts, too.)
For this example, start with the 16-bit value 525 or 00000010000011012, which software must split into two bytes: 000000102 and 000011012 for transfer to the output ports. To get the least-significant byte, use the modulus operation: mod in Visual Basic and % in C/C++. This operation performs modulus division and produces the remainder of a division. So, when software performs the operation:
525 Mod 256
the result yields a remainder of 13 (000011012), the lower byte. Then, software can divide the entire value 525 by 256 and force the result of that operation into an integer value to strip off the remainder:
525 / 256 = 2.05078 and then Int(525 / 256) yields 2
to yield the upper byte 000000102.
Logical operations also can split a 16-bit value into two bytes. Again start with the value 525 or 00000010000011012. Perform a bit-wise AND with 255 and the lower byte “falls through” the mask:
0000001000001101 |
0000000011111111 |
0000000000001101 |
Then move the remaining value into an 8-bit integer to obtain the lower byte: 00001101
Next, use a mask on the upper eight bits:
0000001000001101 |
1111111100000000 |
0000001000000000 |
and divide by 256, which in effect shifts all the bits to the right by eight positions:
0000000000000010
Move the result into an 8-bit integer value to obtain 000000102.
CAUTION: Before you apply math or bit-wise logic operations, always check the language specifications to:
- Ensure its math operations perform the mod and int functions.
- Ensure you can use 16-bit unsigned integer value.
In most cases, you can use other programming steps to perform the same operations, although they may get more complex. Always test your routines with known data. We recommend you always check conversions and I/O operations for any error conditions-such as using an integer instead of a byte value, trying to output a negative value, and so on. Better to check thoroughly with test data than to dump the wrong chemical into a reaction or send a space probe off course due to a software error.
References
- Ganssle, Jack G., “The Secret Life of Switches,” Embedded Systems Programming, April 2004. pp. 61—64. (www.embedded.com)
- Ganssle, Jack G., “Solving Switch Bounce Problems,” Embedded Systems Programming, May 2004. pp. 45—64.
For more information
We hope you found the Chapter 4 informative. To go back to the Main Page, click here.
You can purchase the complete Digital I/O Handbook for only $19.95 by clicking here. The Digital I/O Handbook is FREE with any qualifying Sealevel Digital I/O product purchase.
Categories:
