The Digital I/O Handbook – Chapter 2
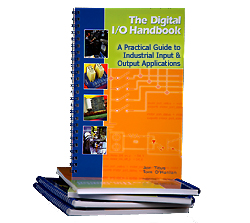
The Digital I/O Handbook
A Practical Guide to Industrial Input and Output Applications
Digital I/O Explained
Renowned technical author Jon Titus and the President and CEO of Sealevel Systems, Tom O’Hanlan, clearly explain real-world digital input/output implementation from both a hardware and software perspective. Whether you are a practicing engineer or a student, The Digital I/O Handbook will provide helpful insight you will use again and again.
- Covers a wide range of devices including optically isolated inputs, relays, and sensors
- Shows many helpful circuit diagrams and drawings
- Includes software code examples
- Presents common problems and solutions
- Detailed glossary of common industry terms
“What I like most is its mix of hardware and software. Most pages have a bit of code plus a schematic. All code snippets are in C. This is a great introduction to the tough subject of tying a computer to the real world. It’s the sort of quick-start of real value to people with no experience in the field.” – Jack Ganssle, The Embedded Muse, January, 2005.
You can purchase the Digital I/O Handbook for $19.95 by clicking here. The Digital I/O Handbook is FREE with any qualifying Sealevel Digital I/O product purchase.
Chapter 2 – Digital Outputs
Topics Covered
- Introduction to output ports
- Simple on/off control
- Using drivers and buffers
- Relay basics
- Relays handle more power
- Optical isolation
- Solid state relays
- Control bits and bytes with software
Introduction to output ports
Electronic devices receive information from computers through a circuit called an output port. That information can control a process, control individual devices, update a display, and so on. Each output port, as shown in Figure 2-1, receives information from a computer’s internal data bus and it also receives a unique strobe signal supplied by the internal circuitry of the computer. Because most people use output ports rather than design them, we won’t discuss port construction further.
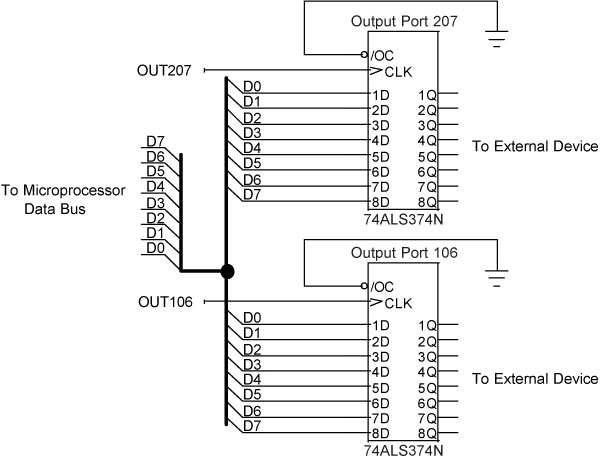
Figure 2-1
Two output ports connect in parallel to a computer data bus. Each output port receives a unique strobe signal that synchronizes the bus with the port’s operation to capture the data.
In most cases, computers transfer eight bits, or one byte, at a time under software control. The computer generates a unique strobe signal, designated something like OUTxyz, for each output port. A software command such as:
outportb (output_port_number, output_data_byte)
controls the flow of data to an output port. The command, outportb, transfers a byte of data (output_data_byte) to a specified output port (output_port_number). The computer’s central processing unit (CPU) properly synchronizes the presence of the byte on its data bus with the strobe signal.
The outportb command shown above does not exist within some programming languages such as Visual Basic. Each manufacturer of add-in cards or devices supplies its own driver software. Drivers come in a library of routines that link a programming language to special operations, such as those that control I/O ports. Thus, drivers define many new commands that a programmer can include in code to transfer a byte to an output port.
You must follow instructions included with an I/O board to properly set up accompanying driver software. The setup process lets your application program know how to find and use the drivers on the computer’s hard drive. (The instructions that accompany a board and its drivers provide installation information and information about how to use drivers in your application program.)
An output port’s signals may provide data, such as an 8-bit code for an ASCII character, say, 010001012, which represents the letter E. On the other hand, the outputs from the port may control eight individual on/off devices. Software cannot tell—and doesn’t care—whether the byte it sends to a port represents the letter E or on/off controls for pumps and valves. A port with eight outputs can produce 256 unique binary patterns, 000000002 through 111111112.
Sometimes, an output port will mix control signals and information, as shown in Figure 2-2. A port that controls a numeric display might use four output lines to represent the digits 0 (00002) through 9 (10012) for the display. The remaining four lines from the port could control a decimal-point LED and other devices independent of the display. You can use the lines from an output port in almost any way you wish.
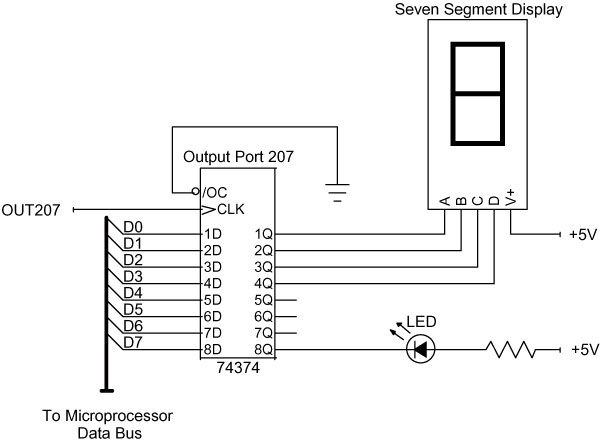
Figure 2-2
An output port’s eight lines can operate independently. In this example, four lines control a binary-coded-decimal (BCD) display while the others control individual devices.
Simple on/off control
A simple output port constructed from TTL devices can directly drive TTL inputs. Driving a display module, for example, may only require connection of the port’s TTL outputs to the TTL inputs on the module. Although TTL outputs can directly sink small currents, circuit designers recommend using driver or buffer circuits to control real-world devices. These drivers, which sink or source current, come with TTL-compatible inputs. Current sinks and current sources often go by the names low-side switch and high-side switch, respectively.
Don’t confuse the hardware drivers that actually operate as part of a circuit with the software drivers that let application software control an I/O port.
Using drivers and buffers
The family of SN7545X devices shown in Figure 2-3 provides four types of gates that drive internal open-collector transistors. Each open-collector output can sink up to 300 mA and can operate with a voltage as high as 30V. This type of driver can control low-current, low-voltage devices such as LEDs, solenoids, relays, stepper motors, and so on. The SN7545X devices act as general-purpose drivers. Manufacturers also supply drivers built specifically to control displays, stepper motors, DC motors, and other devices.
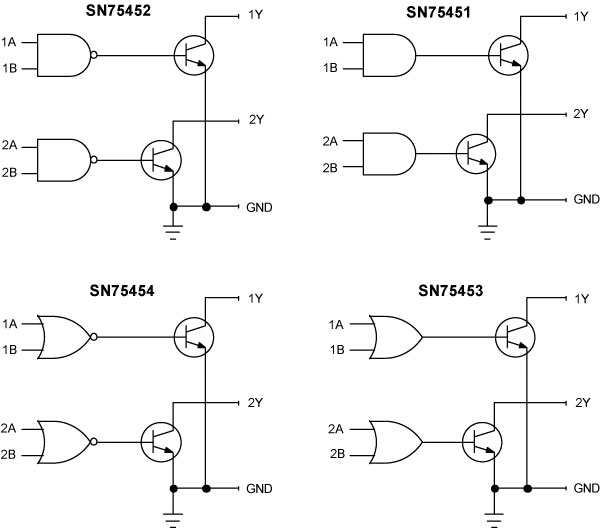
Figure 2-3
Devices in the SN7545X family of TTL-compatible drivers provide all four logic functions. The open-collector transistors come as part of the driver ICs.
Drivers that sink current predominate, but at times, an application may call for a current source, or a high-side switch. The UDN2987A integrated circuit from Allegro MicroSystems (Worcester, MA; www.allegromicro.com) represents a typical current source (Figure 2-4). This device supplies eight drivers, each of which can supply up to 100 mA from a supply voltage as high as 35V. The UDN2987A also includes an overload protection circuit for each driver.
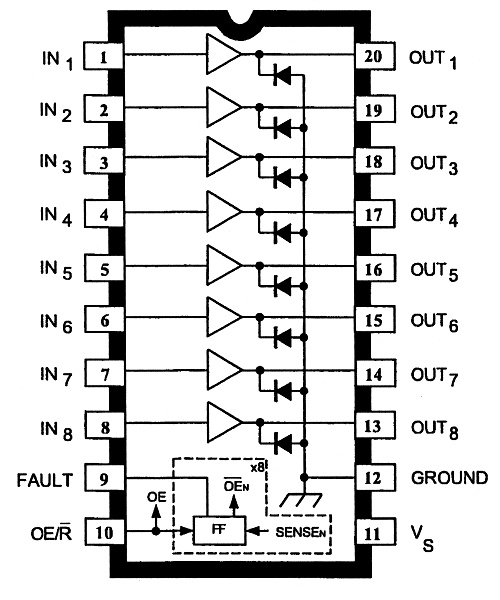
Figure 2-4
The UDN2987A driver supplies eight individual current-source circuits. Similar current-sink drivers also come eight per package. (Courtesy of Allegro MicroSystems)
Relay Basics
The types of drivers described above work well when the output port, the driver circuit, and the device under control all share a common ground, as shown in Figure 2-5. Often, though, devices cannot or must not share a common ground. When a computer controls a device that operates at a high voltage, for example, no electrical connection should exist between the device and the computer. The interface between the computer and the motor should isolate their circuits. An electromechanical device called a relay offers such isolation.
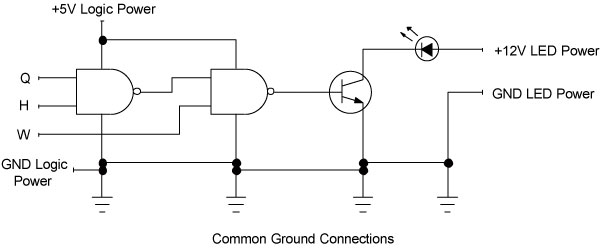
Figure 2-5
Many circuits function with a common ground connection, but some circuits may require separate circuits that have no electrical connection.
A relay contains a small electromagnet that controls an armature—a moving switch contact—held in a “normal” position by a spring. When energized, the electromagnet causes the armature to move to its other position. Remove the energy to the electromagnet and the spring quickly moves the armature back to its normal position (Figure 2-6).
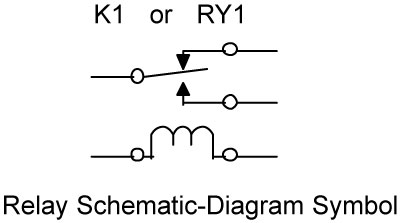
Figure 2-6
An electromagnetic relay provides a movable contact (armature) that can switch between two contacts. An electromagnetic coil actuates the
armature.
Even though the switch and the electromagnet exist close to each other, they share no electrical connection. This means the relay can turn a completely independent circuit on or off. In this way, a small relay controlled by a TTL driver can operate a motor powered by house current, yet no current flows between them. Manufacturers sell relays in a variety of sizes and with a wide range of voltage and current ratings. (For information on relay and switch contact configurations, see Appendix.)
Reed relays, at the small end of the relay spectrum, handle up to 200V and currents as high as 0.5A. As its name implies, a reed relay contains a small magnetic “reed” that forms the moving part of a switch (Figure 2-7a).
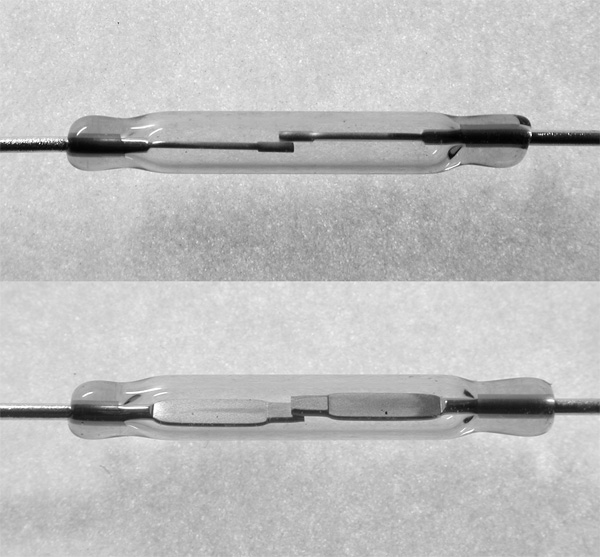
Figure 2-7a
A Reed relay provides two contacts that close a circuit.
Depending on the type of reed relay, one or two other contacts complete the circuit through the switch. Instead of relying on a spring to move the reed, the relay relies on the properties of the metal reed to hold it in its normal position.
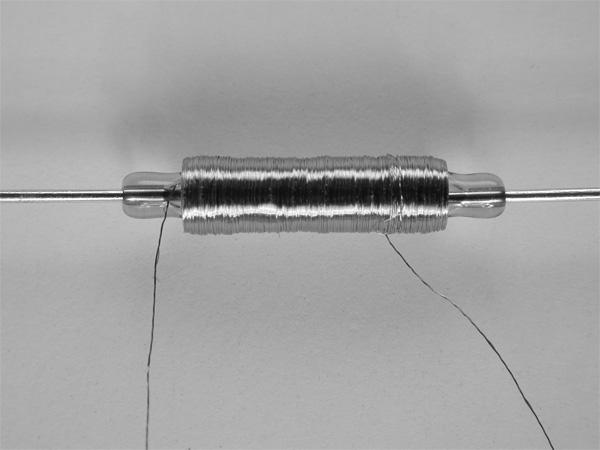
Figure 2-7b
A magnetic field applied by a coil controls relay closure.
The reed and the other contacts come sealed in a small glass tube that fits inside an electromagnetic coil (Figure 2-7b). Sealing the reed and the contacts in a glass tube protects them from contamination and helps ensure reliable operation over millions of on-off cycles.
A variety of reed relay types let users choose from a wide range of voltage and current specifications. Reed relay coils operate at 5V, 12V, or 24V, so drivers such as those in the SN7545X family can easily control them. One output port and eight drivers can independently control eight relays (Figure 2-8).
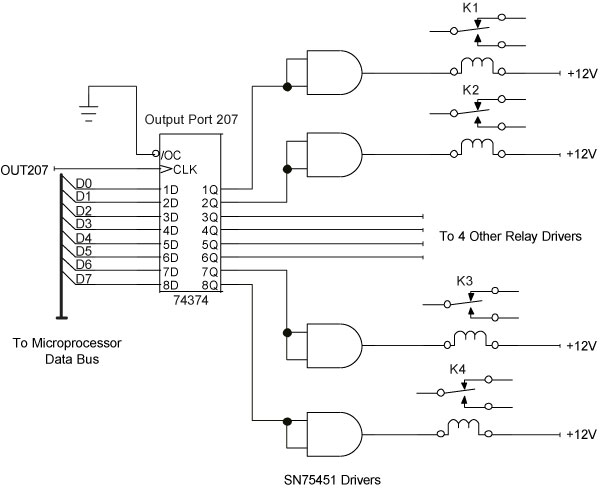
Figure 2-8
An output port and drivers can control eight individual relays. For clarity, the diagram shows only four relays and it does not show connections to the relay contacts.
Not all relays control motors, pumps, and heaters. A series of computer-controlled reed relays can switch one of many sensor signals to the input of a data-acquisition or data-logging system. What you use a relay to control or switch makes no difference as long as you operate it within specified limits. (Note that suppression diodes are not shown in the example schematics. See Glossary.)
Relays handle more power
At the high-power end of the relay spectrum you’ll find relays that switch high voltages and currents (Figure 2-9). Even a small power relay can handle voltages as high as 250V AC and currents as high as 10A; sufficient to control large motors, lamps, heaters, pumps, and so on. In a power relay, the space between the contacts, the size of the contacts, and the materials used to fabricate them determine current-carrying capacity and operating-voltage limits. Relay manufacturers may reduce, or derate, some specifications depending on the type of load a relay will control. In general, relays can carry more current for a resistive load than for an inductive load, such as a solenoid or motor.
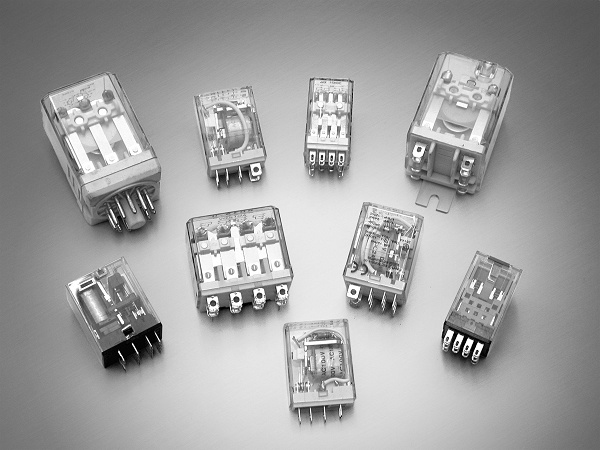
Figure 2-9
Relay manufacturers offer varieties of contact configurations, mounting arrangements, contact characteristics, and cases. (Courtesy of IDEC
USA.)
Optical isolation
When a design requires isolation and a relay isn’t practical, engineers turn to devices that optically isolate a driver from the circuit under control. In a relay, a magnetic field isolates an electrical coil from a mechanical switch, while in an optical device, light provides the isolation. In an optical isolator a circuit turns on or off an LED that shines on a detector. The detector, usually a phototransistor, then turns on or off a separate—and isolated—circuit. Figure 2-10 shows a cut-away diagram of an optical isolator, also called an optical coupler, opto-coupler, or opto-isolator.
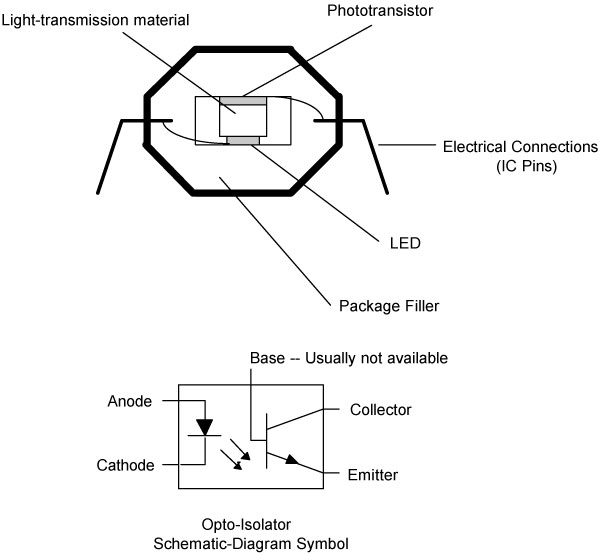
Figure 2-10
A cut-away view of an optical isolator shows the separation of an LED and a phototransistor. The separate circuits can provide an isolation of several thousand volts.
Optical isolators come in a variety of forms, from 6-pin dual in-line package (DIP) devices that supply one LED-phototransistor pair, to larger devices that include several such pairs. Electrical isolation between the LED and the phototransistor ranges from about 1500V up as high as 8 kV, more than enough for most real-world applications.
Although some designs use optical-isolator ICs as stand-alone drivers, their utility increases when they control semiconductors that handle high-power loads. An optical isolator can control a triac—a semiconductor device that can switch power-line current—as shown in Figure 2-11. To reduce switching transients, which can cause EMI and RFI, some optical isolators provide a zero crossing detector. This detector determines when the line voltage signal crosses through 0V, and switches the triac at that time. Switching at the zero-crossing point minimizes the inrush of large currents that would occur if switching took place at other points on the voltage waveform of an AC line-voltage signal.
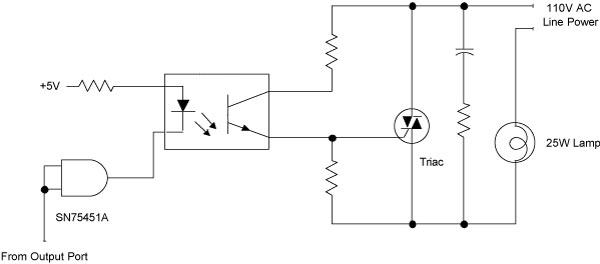
Figure 2-11
A typical solid-state relay circuit uses an Optical isolator to control a triac that switches line voltage to a lamp.
Solid state relays
You don’t have to build your own optically isolated control circuits. Manufacturers supply a wide variety of solid state relays (SSRs) that optically isolate an input from an output that controls high-power AC and DC loads. Modules can provide from one to as many as four control circuits, depending on a user’s needs.
Although solid state relay manufacturers offer a wide array of device types, many conform to standards that allow for the interchange of devices from several manufacturers. You can buy compatible SSR modules from companies such as:
- Crouzet-USA (Coppell, TX; www.crouzet-usa.com)
- Grayhill (LaGrange, IL; www.grayhill.com)
- Opto 22 (Temecula, CA; www.opto22.com)
- Western Reserve Controls (Akron, OH; www.wrcakron.com
CAUTION: Modules usually include an LED to show the state of each relay. Unfortunately, not all modules clearly label each LED and the circuit associated with it. The diagram in Figure 2-12 identifies the circuits in the quad-circuit modules in the OAC and ODC families of AC- and DC-output modules from Opto 22, and the 1781-OA5Q
and 1781-OB5Q families from Western Reserve Controls.
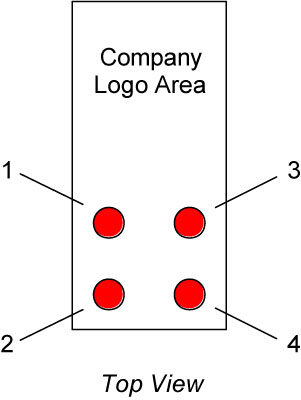
Figure 2-12
The top view of an Opto 22 quad OAC or ODC module (or equivalent) shows the relationship between the internal circuits and the LED indicators.
CAUTION: Manufacturers may designate outputs as “channels” numbered 8—1, although the bits at an output port carry the labels 7—0, for data bits D7 through D0. Bit 0 represents the right-most or least-significant bit (LSB), and bit 7 represents the left-most or most-significant bit (MSB). The chart in Table 1 shows the relationships between the outputs, the bits, and the binary weights for each bit.
Module Channel | Bit Position | Binary Value | Decimal Value |
1 | D0 | 00000001 | 1 |
2 | D1 | 00000010 | 2 |
3 | D2 | 00000100 | 4 |
4 | D3 | 00001000 | 8 |
5 | D4 | 00010000 | 16 |
6 | D5 | 00100000 | 32 |
7 | D6 | 01000000 | 64 |
8 | D7 | 10000000 | 128 |
Table 1
Modules, Bits, and Binary Weights.
To turn on the outputs at positions 8, 5, and 3 in a positive logic system, for example, requires a logic 1 at bits 7, 4, and 2, or a binary bit pattern of 100101002, which translates to hexadecimal 94 (&H94) or decimal 148. A negative-logic system would require a binary bit pattern of 011010112, hexadecimal 6B (&H6B), or decimal 107.
CAUTION: A quad-output module in the OAC and ODC and compatible families of AC- and DC-output modules isolates pairs of outputs from one another, but the two circuits within each pair share a common connection. In applications that control devices powered by the same source, a shared common connection works well. But an application may require controlling 120V AC and 24V AC circuits (Figure 2-13). Although both circuits require AC power, most likely that power doesn’t come from the same source. When in doubt, DO NOT mix voltages within a pair of outputs. Always rely on a manufacturer’s data sheets for complete application information on specific modules.
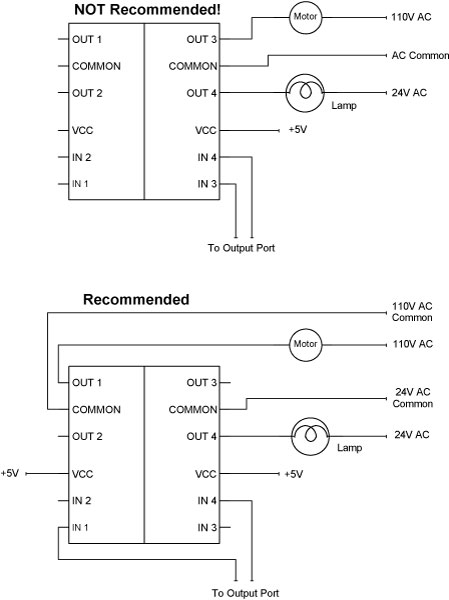
Figure 2-13
Each pair of outputs in an Opto 22 quad OAC or ODC module (or equivalent) provides a single common connection. DO NOT mix circuits in a given pair unless the circuits share a common connection.
CAUTION: You cannot control AC and DC circuits with a single quad module; each type of current requires its own module.
The Sealevel Systems M280 Quad Module Adapter, for example, accepts two of the OAC- and ODC-type modules. The M280 board lets a user employ two AC-output modules, two DC-output modules, or one of each. Modules can plug into either position, and the position determines whether a module controls devices
1—4 or devices 5—8.
Control bits and bytes with software
Now that you understand a bit more about how circuits can turn devices on and off, you’ll learn how software can control bits at output ports to give a computer control over real-world devices. These operations involve manipulating individual bits.
To illustrate how software controls devices, assume you want to turn on or off a pump motor using a solid-state relay connected to bit D4 at output port 207, as shown in Figure 2-14. (The relay would operate at position 5 on a Sealevel Systems’ M280 card.) Table 2-1 below shows the bits needed to control the motor using either positive logic or negative logic:
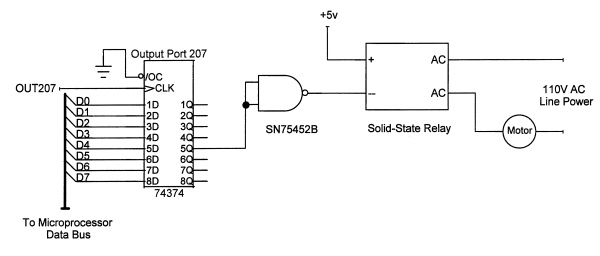
Figure 2-14
A bit at D4 at output port 207 will turn a line-voltage motor on or off. A solid state relay isolates the port from the line current and turns the motor on or off.
Positive Logic | Negative Logic |
1 = ON | 0 = ON |
Table 2-1
Bits needed to control the motor using either positive logic or negative logic.
For now, assume the card uses negative logic. (A following example will explain how to work with positive logic.) If you send a logic 0 to bit D4 at output port 207, the motor runs. If you send a logic 1 to bit D4, the motor stops.
Controlling the output port involves using the general instruction:
outportb (output_port_number, output_data_byte)
Given the decimal weight of bit D4 (16), and knowing the output-port number, you can use commands such as those below to control the pump motor shown in Figure 2-14:
outportb (207, 0) ‘turn pump motor on
outportb (207, 16) ‘turn pump motor off
The command that turns the motor on assumes it’s OK to set the other bits at output port 207 to logic 0. But in practice, output-port bits D7—D5 and D3—D0 probably control other devices. Software that turns the pump on must not disrupt any other devices controlled by this port! Thus, controlling the motor must NOT change any bits except for D4. How can software do that?
To start, the software that controls the pump motor must know the state of the other bits; that is, what devices at port 207 are already on or off. So, before it first uses an output port, application software should set up a byte to store the bits that will go to that port. Then, software can read at any time the state of the bits at a given port. (Each output port requires its own status byte.)
Once software “knows” an output port’s current state, computer operations can control individual bits. The four rules below, based on the truth tables shown in Chapter 1, show how to control individual bits. An X indicates the state of the bit doesn’t matter. It can be a 1 or a 0.
- If you AND bit X with logic 0, the result is always logic 0.
- If you AND bit X with logic 1, you simply get the X bit’s original state.
- If you OR bit X with logic 0, you simply get the X bit’s original state.
- If you OR bit X with logic 1, the result is always logic 1.
Here are the rules in column form:
AND | AND | OR | OR | |
X | X | X | X | |
0 | 1 | 0 | 1 | |
0 | X | X | 1 | Result |
The AND and OR operations can operate on individual bits in the same positions in two bytes of data. These bit-wise AND and OR operations can set individual bits to logic 1 or to logic 0, or leave bits unchanged. Here are examples of a bit-wise AND and a bit-wise OR operation:
Bit-wise AND | |||
D7 | D0 | ||
0 0 1 0 1 0 1 1 | Byte A | ||
0 0 1 1 0 1 0 1 | Byte B | ||
0 0 1 0 0 0 0 1 | Result byte | ||
Bit-wise OR | |||
D7 | D0 | ||
0 1 0 0 0 1 0 1 | Byte F | ||
0 0 1 1 0 1 0 1 | Byte G | ||
0 1 1 1 0 1 0 1 | Result byte | ||
CAUTION: Programming languages provide two types of logical operations; the bit-wise operations shown above and “logical” operations. These designations often confuse even knowledgeable programmers! In C, for example, the symbol & produces a bit-wise AND, while the symbols && produce a logical AND of two statements. Check a programming reference manual for the language you plan to use for details. Our programming examples will use AND and OR to stand for bit-wise operations.
Assume the port-status byte for output port 207 already contains 001101012, so some devices are now on (logic 0), and others, including the pump motor (bit D4), are now off (logic 1).
To turn on the pump motor, software must force bit D4 to a logic 0 but leave the other seven bits unchanged. Rules 1 and 2 (above) show that an AND operation can force a bit to a logic 0 or leave bits unchanged. So, set up a byte and insert a logic 1 at each bit position that should remain unchanged. Next, insert a logic 0 for any bit you want to force to a logic 0:
D4 |
1 1 1 0 1 1 1 1 |
Programmers call this byte a mask byte. A bit-wise AND of the current port-status byte and the mask byte will set D4 to a logic 0, but leaves all other bits unchanged:
D7 | D0 | ||
1 1 1 0 1 1 1 1 | Mask byte | ||
0 0 1 1 0 1 0 1 | Port-status byte for output port 207 | ||
0 0 1 0 0 1 0 1 | Result of bit-wise AND; the new port-status byte | ||
Remember, a bit-wise operation involves only the two bits in each column. Thus, bit D7 in the mask byte gets ANDed with bit D7 in the port-status byte to produce bit D7 in the result, and so on for each column.
In the example above, only bit D4 changed its state as a result of the bit-wise AND operation. Note the result of the bit-wise AND yields a new port-status byte that the software must store and then send to output port 207. Now, bit D4 will turn the pump motor on, but without affecting any of the other bits at the output port.
To turn the pump motor off, software must now force bit D4 to a logic 1 but leave the other seven bits unchanged. Rules 3 and 4 (above) show that a bit-wise OR operation can force a bit to a logic 1 or leave bits unchanged. So, set up a byte and insert a logic 0 at each bit position that should remain unchanged. Next, insert a logic 1 for any bit you want to force to a logic 1:
D4 |
0 0 0 1 0 0 0 0 |
Next, perform a bit-wise OR between this mask byte and the new port-status byte:
D7 | D0 | ||
0 0 0 1 0 0 0 0 | Mask byte | ||
0 0 1 0 0 1 0 1 | Port-status byte for output port 207 | ||
0 0 1 1 0 1 0 1 | Result of bit-wise OR; the new port-status byte | ||
Note that the port-status byte used in this bit-wise OR is the port-status byte produced by the bit-wise AND operation. When you need to control an output port, always use the current status information! Software must now store the result of the bit-wise OR operation as the new port-status byte.
In the bit-wise OR operation, only bit D4 changed state. When software sends the new status byte information to output port 207, the pump motor will turn off.
If you look closely at the mask bytes used in the AND and the OR operations, you may realize that complementary mask bytes turn the pump motor on or off. In binary numbers, a complementary number simply changes logic 1’s to logic 0’s, and vice versa, for example 001012 is the complement of 110102.
The previous port-control example assumed the motor-control output port employs negative logic (1 = off, 0 = on). But, suppose the circuit designers provided the wrong specification and the port actually uses positive logic (1 = on, 0 = off). To control the pump motor, use the SAME logical operations and mask bytes, but use a bit-wise OR to turn the pump motor ON, and use a bit-wise AND to turn it off. Again, software MUST save the port-status byte after each logical operation and the software must send that new status byte to the output port.
The following steps show how to translate the bit-control operations into actual software:
- Establish a status byte for each output port.
- Establish an ON and an OFF mask byte for each bit the software will control.
- Use bit-wise operations and the mask bytes to force individual bits to logic 1 or logic 0.
Here’s how to set up a skeleton pseudo-code program to control an output port. Pseudo-code shows the program structure and flow, but you’ll have to adapt it to the language you choose for an application.
To get started, “define,” or set aside bytes for individual bit masks. A notation such as D7_1 indicates the corresponding mask will set bit D7 to a logic 1. On the other hand, D7_0 will set bit D7 to a logic 0. This sort of variable-naming technique can help you and other programmers decipher a program listing.
The statements directly below set aside storage for 16 byte values:
Dim | D7_1 As Byte |
Dim | D7_1 As Byte |
Dim | D6_1 As Byte |
... | |
Dim | D0_1 As Byte |
. | |
. | |
. | |
Dim | D7_0 As Byte |
Dim | D6_0 As Byte |
... | |
Dim | D0_0 As Byte |
Then establish the bit pattern for each of the masks defined above using their hexadecimal values. The binary values shown as comments in the listing make clear the actual pattern of bits in use:
D7_1 = &H80 | ‘10000000 |
D6_1 = &H40 | ‘01000000 |
D5_1 = &H20 | ‘00100000 |
... | |
D0_1 = &H01 | ‘00000001 |
. | |
. | |
. | |
D7_0 = &H7F | ‘01111111 |
D6_0 = &HBF | ‘10111111 |
D5_0 = &HDF | ‘11011111 |
... | |
D0_0 = &HFE | ‘11111110 |
Next, set aside bytes for a port number and port-status byte for each output port, and a “device on” and a “device off” mask byte for each device the software will control. The code below shows only one port-status byte (motor_port_status), and the on and off masks for a single pump motor controlled at a negative-logic output port by bit D4:
Dim | motor_control_port_number | As Byte |
Dim | motor_port_status | As Byte |
Dim | pump_motor_D4_on_n | As Byte |
Dim | pump_motor_D4_off_n | As Byte |
For clarity, the last two variable names above indicate:
What device the mask will control (pump_motor),
The bit used to control it (D4),
The action (on or off), and
The logic used at the output port (n, for negative logic, p for positive logic).
You can choose your own notation for variables, but we like to use variable names that have as much meaning as possible.
Now the program adds commands that establish the actual mask values:
pump_motor_D4_on_n | = D4_0 | ‘11101111 |
pump_motor_D4_off_n | = D4_1 | ‘00010000 |
Remember, previous software already set up the values for D4_0 and for D4_1.
The program also sets up the motor-control port number, as defined by the system’s hardware:
motor_control_port_number = 207
Should the motor-control port assignment change during development or debugging, it’s easy to change this one assignment of the specific port address. Otherwise you must track down and change every occurrence of “207” in a lengthy code listing!
TIP: After software establishes the bit-mask patterns, such as D4_0, you can use them anywhere in a program when you need to set a bit to logic 0 or 1. So, if you need to control a display that uses output D5 as a control line, simply use D5_0 and D5_1 to set up the two masks to control this bit at the display-control output port. You need not redefine the basic mask patterns again and again.
Finally, the following commands turn on the pump motor:
motor_port_status = motor_port_status AND pump_motor_D4_on_n
outportb (motor_control_port_number, motor_port_status)
The first command forced bit D4 to a logic 0 in the port-status byte and saves that result back in the port-status byte. The next command sends the motor_port_status byte to the output port to control the pump motor.
To turn the pump motor off:
motor_port_status = motor_port_status OR pump_motor_D4_off_n
outportb (motor_control_port_number, motor_port_status)
For a port that uses positive logic, again define the masks, but remember that a logic 1 corresponds to on, and a logic 0 corresponds to off. In this case, the “p” at the end of the mask designated positive logic at the output port:
pump_motor_D4_on_p = D4_1
pump_motor_D4_off_p = D4_0
To turn the pump motor on:
motor_port_status = motor_port_status OR pump_motor_D4_on_p outportb
(motor_control_port_number, motor_port_status)
Then, to turn the pump motor off:
motor_port_status = motor_port_status AND pump_motor_D4_off_p
outportb (motor_control_port_number, motor_port_status)
For more information
We hope you found the Chapter 2 informative. To go back to the Main Page, click here.
You can purchase the complete Digital I/O Handbook for only $19.95 by clicking here. The Digital I/O Handbook is FREE with any qualifying Sealevel Digital I/O product purchase.
Categories:
